Unix/Linux Basics
Various types of data that users create are recorded as files , and be stored in containers that called directories . You can create a directory in a directory and manage files hierarchically.
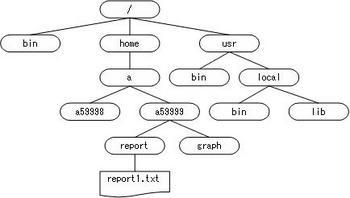
This file structure is called the tree structure because it looks like a tree with branches. In UNIX, the root of the tree is called the root directory and denoted by “/ (slash).” The directory that a user is working is called the current directory.
The concept the path is needed to specify a file on the tree structure. You can specify a file in two methods: absolute path and relative path.
- Absolute path method
This method is to specify files based on the root directory.
(Example)the case of specifying the “report1.txt” in Figure 1.
/home/a/b59999/report/report1.txt- Relative path method
This method is to specify files based on the current directory.
(Example)the case of specifying the “report1.txt” in Figure 1 based on the current directory “/home/a/b59999.”
report/report1.txtThis section describes basic commands commonly used in UNIX.
pwdExample
[b59999@hx001 ~]$ pwd/home/a/b59999 # The current directory is displayedls [option] [filename directory name]Main Option
| Option | Effect |
|---|---|
| -l | Displays details of files |
| -F | Display attributes clearly marked with "/ (slash)" for directories, "* (asterisk)" for executable files. |
| -a | Display files beginning with a " . (dot)" used in the system, etc. |
Example
[b59999@hx001 ~]$ lsfile1.txt file2.bmp dir1 # A file is displayed.
[b59999@hx001 ~]$ ls -a. .cshrc .tcshrc file1.txt dir1 #A file starting with “.” are also displayed.
.. .login .bashrc file2.bmp
.. .login .bashrc file2.bmp
[b59999@hx001 ~]$ ls -Ffile1.txt file2.bmp dir1/ # "/" is appended to a directory.
[b59999@hx001 ~]$cd [directory_name]Example
[b59999@hx001 ~]$ pwd/home/a/b59999 # The current directory is /home/a/b59999.[b59999@hx001 ~]$ cd dir1 # Move the current directory to dir1.
[b59999@hx001 ~]$ pwd/home/a/b59999/dir1 # The current directory has been moved to dir1.cp [options] [copy_source] [copy_destination]Main Option
| Option | Effect |
|---|---|
| -R | If the copy source is a directory, the tree structure under the directory is copied, including its tree structure. |
Example
[b59999@hx001 ~]$ ls -F
file1.txt dir1/
[b59999@hx001 ~]$ cp file1.txt file2.txt #Copy file1.txt as file2.txt.
[b59999@hx001 ~]$ ls -Ffile1.txt file2.bmp dir1/ # file2.txt has been created.[b59999@hx001 ~]$ cp file2.txt dir1 # Copy file2.txt to dir1.
[b59999@hx001 ~]$ ls dir1file2.txt # file2.txt has been copied to dir1.[b59999@hx001 ~]$ cp -R dir1 dir2 # Copy dir1 to dir2.
[b59999@hx001 ~]$ ls -Ffile1.txt file2.txt dir1/ dir2/ # dir2 has been created.
[b59999@hx001 ~]$ ls dir2file2.txt # dir1 is copied to dir2 including the tree structure.
[b59999@hx001 ~]$mkdir directory name]Example
[b59999@hx001 ~]$ ls
file1.txt file2.bmp
[b59999@hx001 ~]$ mkdir dir1
[b59999@hx001 ~]$ ls -F
file1.txt file2.bmp dir1/ # dir1 has been created.
[b59999@hx001 ~]$rm [option] [filename directory name]Main Option
| Option | Effect |
|---|---|
| -R | If the target is a directory, delete it including the tree structure under the directory. |
Example
[b59999@hx001 ~]$ ls -F
file1.txt file2.bmp dir1/
[b59999@hx001 ~]$ rm file1.txt # Delete file1.txt.
[b59999@hx001 ~]$ ls -Ffile2.bmp dir1/ # file1.txt has been deleted.
[b59999@hx001 ~]$ ls -F dir1dir2/ # dir2 is under dir1.[b59999@hx001 ~]$ rm -R dir1 # Delete dir1.
[b59999@hx001 ~]$ ls -Ffile2.bmp # dir1 and its tree structure are deleted.The mv command is used to move files and directories. This command can also be used to change the filename, by moving a file to the same directory.
mv [source_filename] [new_filename]Example
[b59999@hx001 ~]$ ls -F
file1.txt file2.bmp dir1/
[b59999@hx001 ~]$ mv file1.txt dir1 # Move file1.txt to dir1.
[b59999@hx001 ~]$ ls -Ffile2.bmp dir1/ # file1.txt no longer exists.
[b59999@hx001 ~]$ ls dir1file1.txt # Moved to dir1.[b59999@hx001 ~]$ mv file2.bmp file3.bmp # Move file2.bmp to file3.bmp.
[b59999@hx001 ~]$ ls -Ffile3.bmp dir1/ # The filename has been changed to file3.bmp.cat [filename]Example
[b59999@hx001 ~]$ ls -F
file1.txt file2.bmp dir1/
[b59999@hx001 ~]$ cat file1.txt
abcdefghijklmnopqrstuvwxyz # The content of file1.txt is displayed.
[b59999@hx001 ~]$If you use the more or less command instead of the cat command, it stops displaying each page and waits for a command in the case the file is long.
more(or less ) [filename]Example
[b59999@hx001 ~]$ more file3.c
#include <stdio.h>    /* The content of file3.c is displayed. */
#include <math.h>
#include <stdlib.h>
(・・omission・・)
  for(i=0; i<10; i++){
    a[i] = b[i]*c[i];
--More--(10%)

            Press space key to advance to the next page.
logoutExample
[b59999@hx001 ~]$ logout # Log outDisplay the description of the ls command
[b59999@hx001 ~]$ man lsTo display man command messages in Japanese, set the ssh client character encoding to UTF-8 and set the environment variable LANG to ja_JP.UTF-8.
If you are using tcsh
[b59999@hx001 ~]$ setenv LANG ja_JP.UTF-8If you are using bash
[b59999@hx001 ~]$ export LANG=ja_JP.UTF-8The vi editor is a text editor that comes standard with UNIX-like operating systems. Its operating system is very specific and we describe in detail below.
How to Start vi Editor
vi [filename]Two Modes of vi Editor
The vi editor has two modes of command mode and edit mode.
- Command mode
Performs tasks other than text entry, such as searching, replacing, saving files, and deleting characters and lines.
- Edit mode
Enter the actual text.
When you start the editor, the command mode comes up first. You can enter the edit mode with insert commands such as i, I, a, A, o, or O. To return to command mode, press the ESC key.
Moving Cursor
| Character Oriented Jump | |
|---|---|
| h , j , k , l | left, down, up, right ( ← , ↓ , ↑ , → ) |
| Text Oriented Jump | |
|---|---|
| w , W , b , B | Previous/next word |
| e , E | End of the word |
| ) , ( | Beginning of next/previous sentence |
| } , { | Beginning of next/previous paragraph |
| ]] , [[ | Beginning of next/previous section |
| Line Oriented Jump | |
|---|---|
| 0(zero) , $ | Beginning/end of the current line |
| ^ | First character (other than space) of the current line |
| + , ? | First character of the next/previous line |
| _n_l | n’th character of the current line |
| H | First line on the screen |
| M | Center line on the screen |
| L | Bottom line on the screen |
| _n_H | n’th line from the top |
| _n_L | n’th line from the bottom |
| Screen Oriented Jump | |
|---|---|
| CTRL + f , CTRL + b | Scroll to the next/previous screen |
| CTRL + d , CTRL + u | Scroll up/down the half screen |
| CTRL + e , CTRL + y | Display another line at the bottom/top of the window |
| z RETURN | Display the line with the cursor at the top of the screen |
| z. (zed dot) | Display the line with the cursor in the center of the screen |
| z- (zed hyphen) | Display the line with the cursor at the bottom of the screen |
| CTRL + l , CTRL + r | Rewrite Screen (without scrolling) |
| Search | |
|---|---|
| / pattern | Search for patterns in the forward direction |
| ? pattern | Search for patterns in the backward direction |
| n , N | Repeat the last search in the same/opposite direction |
| / , ? | Repeat the previous search in the forward/backward direction |
| fx | Jump to x after the cursor position in the current line |
| Fx | Jump to x before the cursor position in the current line |
| tx | Jump to the character immediately before the x after the cursor position in the current line |
| Tx | Jump to the character immediately after the x before the cursor position in the current line |
| ; | Repeat last search in the current line |
| , | Repeat last search in the current line in the opposite direction |
| Jump by Line Number | |
|---|---|
| CTRL + g | Display current line number |
| _n_G | Jump to line number n |
| G | Jump to last line of file |
| :n | Jump to line number n |
| Mark of Position | |
|---|---|
| mx | Mark current position as x |
| ‘x | Jump to _x |
| “ | Return to the previous mark or context |
| `x | Mark to jumps to the beginning of the line containing x. |
| `` | Return to the beginning of the line containing the previous mark |
Exit Command
| Exit Command | |
|---|---|
| ZZ | Write (save) a file and exit |
| :x | Write (save) a file and exit |
| :wq | Write (save) a file and exit |
| :w | Writing (saving) a file |
| :w! | (Forced) file writing (saving) |
| :q | Finish editing the file |
| :q! | Finish editing the file (cancel all changes) |
| :e! | Return to the current file to the contents at the time it was last written (saved) |
Edit command
| Inserting | |
|---|---|
i , a |
Insert text before/after the cursor |
I , A |
Insert text at the beginning/end of the line |
o , O (Capitalized O) |
Open new line for entering text below/above the cursor |
| Change | |
|---|---|
r |
Change characters |
cw |
Change words |
cc |
Change current line |
C |
Change to the end of line |
R |
Overwrite text strings |
s |
Replace characters with text |
S |
Replace current line with text |
| Moving and Deleting | |
|---|---|
x |
Delete characters |
X |
Delete character before the cursor |
dw |
Delete words |
dd |
Delete current line |
D |
Delete to the end of the line |
p , P |
Insert deleted text after/before the cursor |
| “_n_p | Insert text with delete buffer number n after the cursor (valid for the last 9 deletions) |
| Yank | |
|---|---|
yw |
Yank (copy) word |
yy |
Yank current line |
| “_a_yy | Yank current line to the buffer named a |
p , P |
Paste yanked text after/before the cursor |
| “_a_p | Insert text of buffer a before the cursor |
| Other Commands | |
|---|---|
| . (dot) | Repeat the last editing command |
u , U |
Undo the last edition/recover current line |
j |
Concatenate two lines |
| Using ex Command | |
|---|---|
| :d | Delete a line |
| :m | Move a line |
| :co , :t | Copy a line |
| / , ? | Repeat previous search forward/backward |
| :.,$d | Delete from the current line to the last line of the file |
Emacs is a sophisticated highly customizable text editor often used on UNIX family OS.
When editing using Emacs, you read a file into a buffer, work on it, and then write the edited buffer to the file.
In Emacs editing work, you can switch between multiple editing files, and each buffer is assigned with a name. Usually, the name of the file to be edited is the name of the buffer.
emacs [filename]If a filename is specified when starting, an edit buffer is created with the same name and the file content is loaded. (If there is no file to read, the editing buffer becomes empty.) If a filename is not specified, an editing buffer named scratch is created.
When you launch in an environment where X (window system) is available, a new window will be launched as an X client.
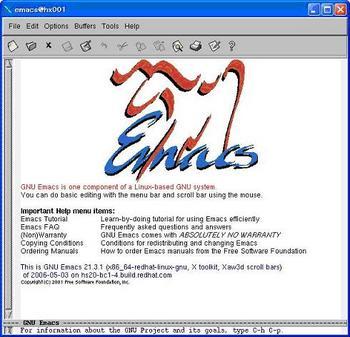
If the window system is not available in your environment, the following screen will appear.

The Emacs screen consists of three sections.
- Text window
Largest section. The text you have entered will be displayed.
- Mode line
It is the black and white reversal line at the bottom of the text window. it shows status of the text window.
An inverted line at the bottom of the text window. It displays the status of the text window.
The approximate meaning of the mode line is as follows.
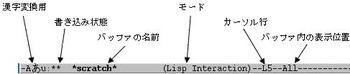
- Echo line
The line below the mode line. Messages from Emacs will be displayed. It is also used to input.
Operations such as moving the cursor use special key input. There are two ways of special key input as below.
-
Enter a character key with the CTRL key pressed down (C-[character_key] ).
-
Enter a character key after pressing the ESC key ( M-[character_key] ).
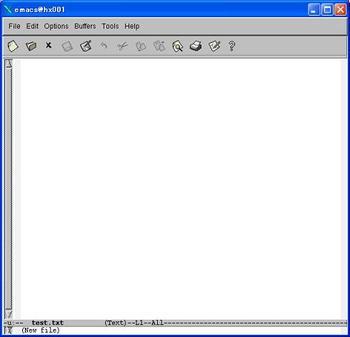
Open a file( C-x C-f )
After starting up Emacs, enter C-x C-f (enter x with CTRL pressed then enter f with CTRL pressed) to load a new file. The following message will appear on the echo line.
```nohighlight
Find file: ~/
```
If Emacs is started from a directory other than the home directory, the path of the current directory will be displayed instead of /~.
Enter the name of the file you want to open (e.g. test.txt) followed by the message and press Enter.
Find file: ~/test.txtA buffer named test.txt is created, and the content of the file is read to the buffer. If the file does not exist, a message (New file) is shown on the echo line.
Enter the Text
Characters are entered at the cursor position on the text window. To delete a character, use the Delete key. (The Backspace key is not used to delete characters.)
Japanese Input System
To enter Japanese, you need start the Japanese input system by pressing C-¥ (press ¥ [backslash] with CTRL pressed). When the system starts, the display in the left corner of the mode line will switch from [ ? - ] to [ A ], which enables romaji kana conversion. To switch off the input system, press C-¥ again.
If you type "k y o u t o d a i g a k u" in a Japanese input system, you will see the following.
| きょうとだいがく |The vertical bars “|” on the both sides indicate that characters in between can be converted to kanji characters. Press the Space key to convert into kanji. The mark at the left corner is changed from [あ] to [漢] meaning kanji conversion.
| 京都大学 |And then press the Space key once more, the next candidate is displayed. To determine the conversion, press the Enter key or C-l . You can also change the length of a segment by pressing C-i or C-o . When you execute kanji conversion for one of the segments, move the cursor to the target segment and press the Space key. To cancel a kanji conversion, press C-c .
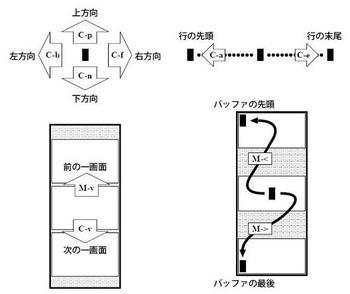
Moving Cursor
How to move a cursor is as below.
| col 1 | col 2 |
|---|---|
C-p |
move up |
C-n |
move down |
C-f |
move right |
C-b |
move left |
C-a |
move to the beginning of the line |
C-e |
move to the end of the line |
Each of the commands mean: p of C-p is previous, n of C-n is next, f of C-f is forward, b of C-b is backward, a of C-a is ahead, and e of C-e is end of line.
| col 1 | col 2 |
|---|---|
C-v |
Scroll to the next screen |
M-v ( press ESC, release it, and then press v) |
Scroll to the previous screen |
M-< |
move to the top of the buffer |
M-> |
move to the bottom of the buffer |
Delete and Copy
There are several ways to delete a character.
| col 1 | col 2 |
|---|---|
| Delete key | Deletes one character to the left. |
C-d |
Deletes one character to the right of the cursor. |
C-k |
Deletes characters from the right of the cursor to the end of the line. |
You can also delete a specified section of text. First, move the cursor to the beginning of the range you want to specify and mark it with C-@. "Mark set" will appear on the echo line. Next, move the cursor to the end of the range and press C-w. And you can delete the entire marked range from the current cursor position.
Texts deleted by C-k and C-w are saved in the copy buffer and you can paste the deleted texts by pressing C-y . The copy buffer is overwritten every time C-k or C-w is pressed. Note that texts deleted by C-d and the Delete key are not saved in the copy buffer.
Undo Operations
To undo the operation, press C-g . "Quit" is displayed on the echo line.To undo the last editing operation, press C-x u. "Undo!" is displayed on the echo line.
Save the File( C-x C-s )
To save your edits to a file, press C-x C-s. If you have been editing in the scratch buffer, "File to save in: ~/" is displayed on the echo line. Please specify a file name and save the file.
Erase Edit Buffer
To erase a edit buffer, press C-x k.
"Kill buffer: (default test.txt)" is displayed on an echo line. Then press Enter key.
If the contents of the buffer have not been changed, it will be erased without message. If the contents of the buffer have been changed, the message "Buffer test.txt modified; kill anyway?(yes or no)" is displayed. Enter "yes" to invalidate the change and erase, or enter "no" and Enter key to cancel the erasure.
To exit Emacs, press C-x C-c.
If there is an unsaved edit buffer, the following message appears on the echo line
(The file name is an example.)
Save file /home/a/b59999/test.txt? (y, n, !, ., q, C-r or C-h)Enter "y" to save the file and exit, or enter "n" to exit without saving and press Enter. If you enter "n", a confirmation message will appear on the echo line. Enter "yes" if you really want to exit, or enter "no" if you want to cancel the exit.
Modified buffers exist; exit anyway? (yes or no)Emacs provides tutorials. To start tutorials, press M-? t. Please try it if you want to master Emacs quickly. In the tutorial, you will learn a lot of other functions that are not introduced here.
The tutorial uses a buffer, so erase it by C-x k when you finish the tutorial.